Difference between revisions of "Manual Installation"
(Initial guide) |
(Added images) |
||
| Line 50: | Line 50: | ||
** Select 'WinRAR' and click 'Open' | ** Select 'WinRAR' and click 'Open' | ||
** Click 'Ok' | ** Click 'Ok' | ||
| + | <gallery> | ||
| + | File:BTWinstallstep8.PNG|Opening minecraft.jar | ||
| + | File:Archiveutility1.PNG|Selecting your archive utility | ||
| + | </gallery> | ||
| Line 61: | Line 65: | ||
* Select all the files (CTRL+A) then drag and drop them into the minecraft.jar window (click Yes when prompted to) | * Select all the files (CTRL+A) then drag and drop them into the minecraft.jar window (click Yes when prompted to) | ||
* Close BTWModx-xx.zip and minecraft.jar | * Close BTWModx-xx.zip and minecraft.jar | ||
| + | <gallery> | ||
| + | File:BTWinstallstep9.PNG|Delete META-INF | ||
| + | File:BTWinstallstep10.PNG|Contents of ModLoader.zip | ||
| + | File:BTWinstallstep11.PNG|Dragging and dropping the ModLoader files into minecraft.jar | ||
| + | File:BTWinstallstep12.PNG|Contents of BTWModx-xx.zip | ||
| + | File:BTWinstallstep13.PNG|Contents of MINECRAFT-JAR folder | ||
| + | File:BTWinstallstep14.PNG|Dragging and dropping the MINECRAFT-JAR folder files into minecraft.jar | ||
| + | </gallery> | ||
'''Better Than Wolves is now installed and ready to play!''' | '''Better Than Wolves is now installed and ready to play!''' | ||
Revision as of 16:42, 23 August 2012
This is the standard method to install Minecraft mods.
What you'll need
To install BTW you will need the following:
- The latest version of ModLoader found here.
- The latest version of Better Than Wolves found here.
- An archive utility such as 7-Zip or Win-RAR
You do not need to extract ModLoader or BTW from their zip files
Installation
1) BTW should be installed in a clean version of Minecraft (i.e. no other mods are installed). To do this follow these steps:
- Open Minecraft
- Click 'Options'
- Click 'Force Update'
- Click 'Done'
- Login
- Minecraft will download a clean version of all the necessary files, once it has finished you will see the title screen
- Quit Minecraft
2) Next you need to locate where Minecraft is installed on your computer. The default location is C:\Users\YOUR USERNAME\AppData\Roaming\.minecraft. To get here quickly follow these steps:
- Hold the windows key and press R
- In the Run window type %APPDATA%
- Click 'Ok'
- Windows Explorer will open the AppData folder
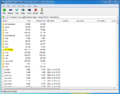
- Open the .minecraft folder
- The folder should look like the image below (you may have some additional folders)
- If you have a 'mods' folder make sure it is empty
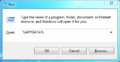
Run window
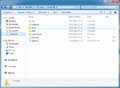
Clean Minecraft folder


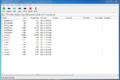
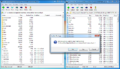
3) Next you will need to open minecraft.jar using your archive utility. To do this:
- Open the 'bin' folder in .minecraft
- Right-click on minecraft.jar and select 'Open with'
- If you see your archive utility listed, select it and click 'Ok' then skip to step 4. If not then keep reading
- If your archive utility is not listed then you need to find it.
- For 7-Zip
- In the 'Open with' window click 'Browse'
- The folder 'Program Files' will open
- Open the '7-Zip' folder
- Select '7zFM' and click 'Open'
- Click 'Ok'
- For Win-RAR
- In the 'Open with' window click 'Browse'
- The folder 'Program Files' will open
- Open the 'WinRAR' folder
- Select 'WinRAR' and click 'Open'
- Click 'Ok'
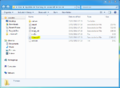
Opening minecraft.jar
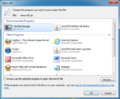
Selecting your archive utility


4) A window will open showing you the contents of minecraft.jar. We need to delete a folder then add some files. When adding files in the next few steps make sure you are putting them in minecraft.jar and not one of the folders inside it!
- Delete the META-INF folder by right-clicking it and selecting 'delete'
- Find where you downloaded ModLoader.zip and open it
- Select all the files in ModLoader.zip (CTRL+A) then drag and drop them into the minecraft.jar window (click Yes when prompted to)
- Close the ModLoader.zip window
- Find where you downloaded BTWModx-xx.zip and open it (x-xx is replaced by the latest version number of BTW )
- Open the folder called MINECRAFT-JAR
- Select all the files (CTRL+A) then drag and drop them into the minecraft.jar window (click Yes when prompted to)
- Close BTWModx-xx.zip and minecraft.jar
Delete META-INF
Contents of ModLoader.zip
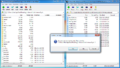
Dragging and dropping the ModLoader files into minecraft.jar

Contents of BTWModx-xx.zip
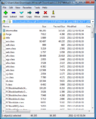
Contents of MINECRAFT-JAR folder
Dragging and dropping the MINECRAFT-JAR folder files into minecraft.jar


Better Than Wolves is now installed and ready to play!